

Have you considered making some of your Christmas gifts yourself this year? You haven't found anything worth trying out yet that's easy and fun to make but also looks nice and doesn't cost a fortune to make? Well here's an idea. Make a chain bracelet with his/her favorite color! Materials are cheap if you make a few, maybe ask a friend to join!?
For this DIY you will need:
- cotton thread of your choice
- some chain with a silver finish/coating
- something to cut the chain with (I used tongs and a hammer)
- scissors
- a clasp (optional)
Start with measuring the chain, you can use any bracelet to help. If you know he/she has a small wrist, just make it a little smaller (obviously). If you want to be really sneaky, measure one of his/her bracelets - without him/her noticing! A good, standard size that should fit most wrists is 17,5 cm . Double the length, since the chain will go around in two layers, so you'll need about 35 cm of chain with a silver finish.
If you wish to add any kind of clasp to your bracelet, make the chain shorter. I made two versions, one with a clasp. Scroll down to see photos of the both of them before deciding.
The cutting of the chain was the hardest part. Use tongs and a hammer like I did if you can't think of anything better or if you're like me and don't own your own toolshed with all the goodies. Don't use expensive tongs for this!
Measure a generous amount of thread. For a standard size bracelet I used a double 1 m 60 cm. The bracelet looks good in any color so choose one that you know he/she will love (obviously). Black is always a safe choice though. Or make two, one in black and one in a brighter color that can be worn both separately and together.


Fold the chain in two.

Start by pulling the thread from both rows of chain. Turn it around upside down, each end of thread goes through the other hole, so they change places with each other. Turn it upside down again so that the side you started with is facing up, toward you.

The side you originally started with will be the criss cross side. The thread forms a row of X's. On this side you always cross the thread over and go through the next hole in the chain. Then turn the piece again upside down.


On the other side, the thread will form a row of letter I's. Here the thread always goes from the two holes of the chain that are on top of each other.
It's simple. On the other side of the bracelet you form a letter X with the thread, then just turn it around and make a letter I on the other side. Continue all the way to the end of the chain. Tie the thread and add a clasp if you like.

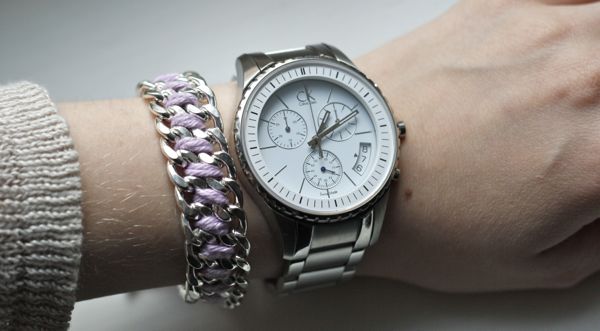
The bracelet with a simple, tie it around itself -version compared to the one that has a clasp made of a screw nut bolt.


