Showing posts with label DIY. Show all posts

Upcycled Headboard


posted by Tippytoes on , , , ,

No comments


 Design hotel Klaus K has transformed it's two areas, restaurant Ilmatar and  the most of former nightclub Ahjo, into one holistic space called The Livingroom (nightclub Ahjo still exists, it's just significantly smaller and is located behind the curtains, in the back). Due to the renovation most of the interior decor of the area was demolished and replaced. While I was walking around photographing the construction site to document the process a certain cushion-like covered pilar caught my eye. I asked hotel manager Marc Skvorc if the panels of the cover would be removed and thrown away - he said "yes". I thought it was such a shame! Too often materials are thrown away instead of reusing them. I told Marc I could make it into a headboard for my bed and asked if I could have it. I didn't want it to take too much time or effort from the construction workers that were already on a tight schedule. Marc promised to look into it, whether or not it could be removed without it getting torn. 
 A few months later, last Friday, I was excited to carry the piece into a taxi van and finally take it home. I have now adopted a piece of a pilar from a former nightclub - how cool is that?! A pretty pieceful retirement home for this lucky pilar panel turned headboard after 8 years of partying!

 This piece has cost me 15€ so far (transportation by taxi) - not bad! It still needs to be lifted off the floor and properly attached to the wall.  

 Hopefully other hotels and public spaces will follow the lead! 


A photo by Klaus K of former Ahjo. You can spot the pilar behind the bar counter. 

Personalize Your Belongings


posted by Tippytoes on ,

No comments


They're here! My very own set of steel punches! I've only tried them on leather so far but they can also be used for wood, plastic and metal. What a great way to personalize your belongings. Or your friend's! I thought I might engrave something on my dog's collar and a few leather strap bracelets next. 

I didn't want to invest a significant amount of money on these so I went for the cheapest ones. They work just fine! I'm sure these will last a lifetime. They're made of hardened chrome vanadium steel and they have a corrosion-resistant oxide finish to keep them in good shape. 


Turn Your Old T-Shirts Into A Rug


posted by Tippytoes on , ,

No comments


I introduced a technique on how to transform a t-shirt into a ball of thread earlier in my blog. Find instructions and read the post HERE. I also promised to share an idea on how to put that thread into use. 


I decided to crochet a huge rug which measures 2 m x 2,2 m. Since I was impatient and wanted to utilize all the material I could get my hands on, I mixed all kinds of colors together to create a bright, happy colored rug which I think, gives it some character! Adding white thread here and there makes it look fresh and black thread gives it some depth.


If you want to avoid getting knots in your rug, you can either sew the thread together or buy packs of different colored jersey from your local fabric store. Don't invest in expensive kinds, you can find real bargains on sale since each piece doesn't have to be that big! If you're in Helsinki I suggest you check out what Eurokangas stores have to offer, they usually have hideous colored jersey in their sale department, which is a good thing! Remember, with this DIY project you're allowed to go over the top! 


Cookie Jars


posted by Tippytoes on , ,

No comments


A last minute diy gift idea! Decorate glass jars and bake something to fill them with. These are from Clas Ohlson, 2,50 € each. I used a window decorating paint to decorate them with because it's water resistant and therefore the jars are easy to clean. Transparent glue and glitter would've been an alternative if non-eatable things would've been put inside. 


DIY Chain Bracelet


posted by Tippytoes on ,

No comments

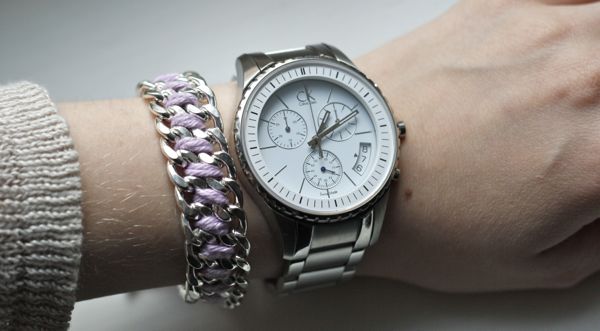
Have you considered making some of your Christmas gifts yourself this year? You haven't found anything worth trying out yet that's easy and fun to make but also looks nice and doesn't cost a fortune to make? Well here's an idea. Make a chain bracelet with his/her favorite color! Materials are cheap if you make a few, maybe ask a friend to join!? 


For this DIY you will need:

- cotton thread of your choice
- some chain with a silver finish/coating
- something to cut the chain with (I used tongs and a hammer)
- scissors
- a clasp (optional)

Start with measuring the chain, you can use any bracelet to help. If you know he/she has a small wrist, just make it a little smaller (obviously). If you want to be really sneaky, measure one of his/her bracelets - without him/her noticing! A good, standard size that should fit most wrists is 17,5 cm   . Double the length, since the chain will go around in two layers, so you'll need about 35 cm of chain with a silver finish. 

If you wish to add any kind of clasp to your bracelet, make the chain shorter. I made two versions, one with a clasp. Scroll down to see photos of the both of them before deciding.

The cutting of the chain was the hardest part. Use tongs and a hammer like I did if you can't think of anything better or if you're like me and don't own your own toolshed with all the goodies. Don't use expensive tongs for this!


Measure a generous amount of thread. For a standard size bracelet I used a double 1 m 60 cm. The bracelet looks good in any color so choose one that you know he/she will love (obviously). Black is always a safe choice though. Or make two, one in black and one in a brighter color that can be worn both separately and together.


Fold the chain in two. 


Start by pulling the thread from both rows of chain. Turn it around upside down, each end of thread goes through the other hole, so they change places with each other. Turn it upside down again so that the side you started with is facing up, toward you. 


The side you originally started with will be the criss cross side. The thread forms a row of X's. On this side you always cross the thread over and go through the next hole in the chain. Then turn the piece again upside down. 


On the other side, the thread will form a row of letter I's. Here the thread always goes from the two holes of the chain that are on top of each other. 

It's simple. On the other side of the bracelet you form a letter X with the thread, then just turn it around and make a letter I on the other side. Continue all the way to the end of the chain. Tie the thread and add a clasp if you like.


The bracelet with a simple, tie it around itself -version compared to the one that has a clasp made of a screw nut bolt.  


Upcycling: T-Shirt into Thread DIY


posted by Tippytoes on ,

No comments

Here's how Wikipedia explains the term "upcycling" : 


"Upcycling is the process of converting waste materials or useless products into new materials or products of better quality or for better environmental value."


This old top got transformed into a ball of thread. We all own a few old t-shirts or tops that may have a stain or two, some holes or just generally appear worn out, this is a great way to give them a new life!


If the directions seem confusing don't hesitate to ask for more details! Start by cutting the top part of the top / t-shirt off, cut the front and back of the shirt at the same time, so there's two layers of fabric. I also cut the hem off because it doesn't look that neat as thread. Continue cutting 3 cm wide strips laterally, don't cut all the way to the other seam, but leave a few centimeters uncut so that the strips are attached to each other. 


Here's the tricky part: lay the stripped piece flat on the table, the other seam facing up. It helps if you draw dotted lines with a marker diagonally from one strip to the other. Once you've cut all the strips diagonally from the part that attached them you should have one long piece of 3 cm wide thread, all you have to do now is stretch it really well and gather it into a ball. 

I will reveal how I used this thread a little later. Let's just say it's something big and heavy!


Englanninkielinen termi "upcycling" ei ole tainnut vielä saada suomenkielistä vastinetta, mutta se tarkoittaa, että jokin esine saa uuden käyttötarkoituksen. Käyttökelvottomat tai tarpeettomaksi käyneet esineet tai materiaalit saavat uuden elämän, jossain toisessa muodossa. 


Tässä postauksessa muutetaan t-paita / toppi trikoolangaksi. Kirpputoreja kiertäneenä, sekä myyjän, että ostajan näkökulmasta, voin kertoa, etteivät kulahtaneet t-paidat kuulu kuumimman kauppatavaran joukkoon. Tässä siis kätevä tapa pistää reikäiset, kellastuneet ja paremmat päivänsä nähneet paidat uusiokäyttöön! Työvaiheet on ehkä helpompi ymmärtää kuvien avulla, mutta jos jokin vielä jää askarruttamaan, kysy toki lisää!


Asettele paita siististi, jotta saat tasaisen lopputuloksen. Leikkaa paidan yläosa irti, kainalosta kainaloon, jos paidassa on sivusaumat, saumasta saumaan. Paidat, joissa ei ole sivusaumoja, toimivat tässä paremmin, niistä tulee siistimmän näköistä lankaa. Leikkaa yhtäaikaa paidan etu- ja takakappale, kangasta on siis kaksi kerrosta. Leikkaa myös paidan helma taitoksen kohdalta irti, sillä siitä ei saa siistinnäköistä lankaa. Leikkaa ( taas kangasta kaksinkerroin) n. 3 cm leveitä vaakasuoria hapsuja, paidan toisessa reunassa jätä muutama senttimetri leikkaamatta, jotta hapsut muodostavat yhtenäisen kappaleen.


Kun olet hapsuttanut vaatekappaleen koko leveydeltä, tulee hieman haastavampi työvaihe. Käännä hapsujen liitoskohta itseesipäin työtasolle. Leikkaamista helpottaa, jos piirtää avuksi katkoviivoja. Kuvasta on toivottavasti enemmän apua, mutta yritän selittää parhaani mukaan. Leikkaa hapsut niiden liitoskohdasta, eli paidan sivusauman kohdalta, josta hapsut ovat kiinni toisissaan, diagonaalisti toisiinsa nähden. Leikattuasi kaikki hapsut, lopputuloksena ne muodostavat yhtenäisen nauhan. Venytä pieni pätkä aina kerrallaan, jotta saat kuvan mukaista lankaa ja lopuksi kieritä kerälle. 

Paljastan hieman myöhemmin mitä tästä langasta syntyi, mutta vinkkinä voin kertoa, että se on jotain isoa ja painavaa!

DIY Christmas Tree Ornaments


posted by Tippytoes on ,

No comments


I found this really cool DIY project by Curbly from HERE


Curbly used some glitter spray paint is his creations, but since I couldn't find any I used a combination of glue and glitter powder instead. He also found a bunch of interesting, cool animal figures (which were 40% off)! I have to admit I'm a bit jealous! Don't they look amazing!?

I went with a penguin and an elephant. It was very challenging to find materials, once again. 


Start by painting the figure with an acrylic paint of your choice. Once it's dry, screw the hook in, find the right spot where the figure hangs in balance. Paint the figure with glue and spread a generous layer of glitter on it. Let it dry for 24 hours. Tap the excess glitter off and tie a string on the hook. 

I used a different type of glitter on each animal, which one do you like more?


Löysin todella hienon DIY -idean Curbly:ltä TÄÄLTÄ.

Toteuttamista vaikeutti materiaalien huono saatavuus. Curbly käytti projektissaan glitter -spraymaalia, jota en Suomesta löytänyt, joten korvasin sen liimalla ja irtohileellä. Muovieläimiäkin oli heikosti saatavilla, mutta kaksi  mieleistä kuitenkin löytyi! Suomessa Schleichin muovieläinten hinnat ovat hävyttömiä, yhdestä pienestä muovinpalasta voi joutua maksamaan jopa 7€, kun samaisen saisi Amerikasta kolmen euron hintaan - sympatiat etenkin pienten lasten vanhemmille! Suosittelenkin metsästämään näitä kirpputoreilta, nuorempien sisarusten lelulaatikoista tai secondhand -lelukaupoista.

Maalaa figuuri haluamallasi akryylimaalilla. Maalin kuivuttua, kierrä koukku kiinni esineen tasapainopisteen kohdalle. Levitä liimaa siveltimellä ja ripottele reilu kerros glitteriä päälle, anna esineen kuivua rauhassa 24 tuntia. Kopauta ylimääräiset glitterit pois ja sido narunpätkä koukkuun ripustamista varten. 

Powered by Blogger.